🎤 Build, Play, and Shine!
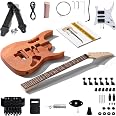
The Leo Jaymz DIY Electric Guitar Kit in IBZ style offers a premium crafting experience with a solid mahogany body and maple neck. This all-inclusive kit features pre-drilled cavities for easy assembly, H-S-H pickups, and a stunning laurel wood fingerboard with pearl inlays, making it perfect for aspiring musicians and seasoned players alike.
K**N
Don't be scared....DO IT! These kits are awesome!
The body....good quality wood, machined accurately. Everything fit just right. Pickups that came with it are not splittable, but will play just fine, and be easy to hook up. This kit has easy wiring, but not versatile wiring. dime-sized potentiometers, which work fine. Tuning machines, I did not use...upgraded to locking tuners.The neck, C-shaped profile. Good, though simple. Nut, plastic but adequate. It was machined beautifully and fit the cut out in the body perfectly. very good! I used brass threaded inserts and not the included wood screws. The fret board was flat and useable right out of the box... Very good! The frets were even, though I did have to work them a little. Very good....but you will have to do a little work. I say very good frets, right out of the box...just need a little extra work.Ovverall, I am completely satisfied by this kit. I knew I would need to finesse it into what I wanted it to be, but it required only a little bit of work. For the money, OUTSTANDING!The instruction book is EXCELLENT! Best in the industry! There is even a link to online free guitar instruction for a couple months.!All in all... this is a fantastic package! I will be getting another soon...perhaps a bass!
M**D
You can build great-playing guitars
I've now built three of the Leo Jaymz kit guitars - the SG style (my first build), the T style (2nd build), and the Explorer (AX) style. Overall, I've hugely enjoyed them and I'm definitely addicted to these things :)The good:- Complete kits, at least for me everything fit together well- Good quality woods. Maybe I just got lucky, but all three of my kits had nice grain, no knots, no issues with the woods. The maple neck on my T style has some quite impressive grain once stained. The AX kit had a small glue stain on the front, but since I was going for a "beat up, reclaimed wood" look, it was no big deal.- Good fret boards - other than polishing the frets and cleaning up 1-2 sharp frets, there was nothing I had to do other than oil the necks.- The price! My wife would tell you it was a relatively cheap way to keep me occupied for weeks :P- The AX guitar had quick connects for the electronics. A welcome surprise!The less good:- The instructions, especially for the SG style, leave a lot to be desired in their clarity. There are definite suggestions on how to make instructions clearer to reduce mistakes. Because of my mistakes on the first guitar, I didn't make any on the 2nd, so that's a plus. The AX style guitar had no instructions at all. So don't do that one first.The subjective:- After the builds, both guitars are quite playable and sound very good. The SG has relatively tame pickups (~9.1k & 9.5k), so hotter than an under-wound PAF, but not super modern either. Sounds very good with some overdrive. I ended up swapping the TL pickups with an aftermarket set since there was a specific sound I was going for. I put an Alpha/Omega set in the Explorer, and they sound epic. I didn't bother checking the output on the stock pickups.- Hardware is all serviceable. If you asked what I would replace, in this order: Tuners, nut, pickups, anything else. That said, both guitars stay in tune just fine.Some lessons learned:- Mock up all the components before you assemble or paint anything. On the SG style guitar, it turns out if you just use the measurements in the instructions, at least on mine, the neck gets glued too close to the pickup for the pickup ring to fit. It also means the intonation is slightly off now that it's all assembled. Similarly, on the T style, the aftermarket bridge pickup was slightly larger than the cavity in the wood. No big deal, i just shaved a couple mms of wood off and now it's a perfect fit.- On both guitars, there's a ground wire that goes to the bridge. Forgetting it on the T style bridge isn't a big deal, since you can just remove the bridge with a few screws. On the SG guitar, you can't remove the bridge screw holes once they are in, so i had to get some conductive adhesive to make the ground wire work.Now that I've built a couple, I will definitely build more. Particularly for guitars in a style of music I don't normally way, it's a great way to get an instrument you like at a good price, and get some good enjoyment along the way. If you are trying to do this to get a PRS 10 top instrument for $200, you'll probably be disappointed. If you are doing this for fun and to come out with a totally great playable instrument, you'll have a lot of fun doing this.
R**C
review on Telecaster version and build
OK, this is a sub $100 kit that includes body, neck, tuning machines, pickups, switches, volume and tone control, strings and an amp cord. that is an amazing price. But...... the tuning machines were really cheap. I replaced those with wilkinsons. The nut on the neck was low quality so replaced that..... But remember this is a sub $100 kit. do not expect $100 tuners and $200 pickups.The body wood was a 3 piece wood body. the wood grain and color did not have a great match. If you are painting this is not an issue. I stained and used clear lacquer so you can see it. Not a big deal.The nut was cheap white plastic. I could not find a tusq that would fit. so I bought a blank and made my own bone nut. Pretty easy and much easier to do before the neck is finished.Speaking of finish. This was my first guitar finish job. If it is yours do you research and take your time.The body was fairly smooth out of the box, I sanded the body to 320 grit, did a pore fill. sanded. Pore filled again, sanded, pore filled again. I wish I would have done a 4th pore fill. I then stainedI then sprayed 3 coats of vinyl sealer, sanded, applied another coat of vinyl sealer and, sanded to 400 grit.I then applied about 12 coats of clear lacquer with sanding every 4 coats. My goal was a mirror-like finish. I got close after sanding to 5000grit and then buffing.The neck was pretty much the same. the frets will get coated with lacquer which needs to be removed. So I took the opportunity to do a fret level, recrowning and polishing which removed most of the lacquer. I took a bit of hand sanding to remove the excess on the sides (tape up your lacquer to protect it).the neck to body angle was off a bit, it would still play good, but i added a 1/2 degree shim to angle the neck back a bit.Wiring is plug and play be aware of the exposed pickup ground wires hitting copper shieilding in the cavities, this will kill the sound.After finishing up the setup, truss rod, intonation, string height it was ready to plug in.the cheap single coils hum a bit, but again, this is a sub $100 kit. Most decent pickups are $100-200 for a set. I plugged it into a Marshall amp and it sounds decent. I do not have a Fender Telecaster to compare the sound, but It had a decent tone, maybe not the tone you want, but it sounded good. I added a 4 way switch to be able to run the pu in series and that added some beef to the sound.I used both min-wax lacquer and lacquer from a local woodworking supply. Heated the lacquer up in hot water and it gave a pretty good finish. I probably could have done a few more coats and more sanding and could have had a close to perfect finish, but hey this is a sub $100 kit. Total cost including sand paper, vinyl sealer, stain, pre filler, lacquer, nut blank, new tuners and the 4 way switch is about $220 .Great learning experience on making and setting up a guitar and fret work.
Trustpilot
3 weeks ago
3 weeks ago