Light Up Your Journey! 🚙✨
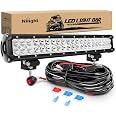
The Nilight ZH006 LED Light Bar is a powerful 20-inch, 126W combo light designed for off-road vehicles. Featuring advanced LED chips and a waterproof design, it provides exceptional brightness and durability. The adjustable mounting bracket allows for easy direction changes, making it perfect for any adventure. The package includes a wiring harness and mounting brackets for straightforward installation.
| Item dimensions L x W x H | 22 x 4.5 x 5 inches |
| Brand | Nilight |
| Color | 126w Light + Wiring harness |
| Form Factor | Bar |
| Recommended Uses For Product | Vehicle Exterior |
| Auto Part Position | Front Center |
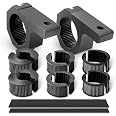
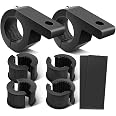
| Included Components | 1PC 126W Combo LED Light Bar, 1PC Wiring Harness and Mounting Brackets |
| Connectivity Technology | USB |
| Item Weight | 3 Pounds |
| Material | Aluminum |
| Water Resistance Level | Waterproof |
| Remote Control Included? | No |
| Number of Pieces | 1 |
| Global Trade Identification Number | 00600537016859 |
| Manufacturer | Nilight |
| UPC | 600537016859 |
| Model | ZH603 |
| Item Weight | 3 pounds |
| Product Dimensions | 22 x 4.5 x 5 inches |
| Country of Origin | China |
| Item model number | ZH006 |
| Is Discontinued By Manufacturer | No |
| Exterior | Painted |
| Manufacturer Part Number | ZH006 |
J**N
Great for the price
Brightness: extremely bright for its size. Long row of bright spot lights with a smaller row of fog lights on each end.Mounting: putting it behind my grille guard was extremely easy. The included wiring harness was a breeze to install for my first time. There are no instructions but a very straightforward chart with how and where to wire everything. Installation of the on/off switch was as easy as drilling a hole and pushing it through the rubber gasket with the rest of the vehicles wires.Final thoughts: Nilight’s durability and price is consistent with all products. My low beams are great, and the yellow flood lights have worked for months and even survived being ripped off my car with my old brush guard.Heads up: buy a battery extension bolt. If your accessory wires on your battery seem to be loose or the bolt doesn’t screw in much, just buy it and save yourself some trouble of a dead car with a loose battery bolt.
A**N
Excellent Mounting Hardware for Bull Bars
I installed this light bar and wire harness on my 2016 Jeep Wrangler. It mounted perfectly on top of the bull-bar brackets on EAG front bumper. The light is very bright, and the harness is well made. The install wound up taking me about three hours but would have only taken one hour for a smarter man. See the story below for a detailed description of my dumbassary.The Story Below: Getting the bar out of the way first…. Pretty simple---I just put on the mounting brackets like they appear they should be put on. Then, I set the brackets 12” apart (6” from center point of the bar) and the bolts slid right into the bracket points on my bull-bar. Easiest part of the whole install. The only even minor issue is that they supplied three extra washers and an extra screw which caused me to wonder if I’d missed something.I drove it around over some bumps and such to see if I could shake it loose but it held in place pretty well. I didn’t hook up the harness until I could set aside some time to do so.Good thing that! It took me a lot longer than I’d anticipated.I’ll start from the relay. I pinned the tab down on the insulation keeper post in the top PS corner of the engine compartment, and zip tied it to the existing harness for added stability. From there I made three ‘runs’ ; Battery, Switch, and Light-bar. I’ll tell you about them in order of increasing difficulty.Battery- Yeah, just put the red on the red and the black on the black.Switch- This leg of the harness has an inline connector and a toggle switch at the end. Starting from the relay, I ran it behind the existing harness using two zip-ties so that the connector winds up close to the DS corner on the other side of the engine compartment. I pulled the a-pillar inside cover and the DS dash end-cover off and ran the wire through a hole I found that let me snake the wire through the void under the hood cowling. This hole was filled with insulating foam, but I shoved a wire hanger through it and drug the harness (spade connectors attached) back from the engine compartment side into the cabin. I drilled a ¾” hole in the a-pillar panel---pushed in the toggle button, replaced all the panels and then went back to the engine side to zip-tie the harness to the existing harness and reconnect the connector. Weirdly, there was exactly enough wire to do this---makes me wonder if Nilight didn’t have this exact install in mind.Light-Bar- I just snaked this along the top edge of the PS side, and under the fuse box mounting bracket. Then, I undid the grill to get access so I could drop down to the existing fog light harness that goes to the bumper. I’m putting zip ties all along here about every foot or so---just to keep things tidy. The harness has two light connector branches and since I only needed one, I used electrical tape to seal up the first one, taping it to the harness for safe keeping.Now, THE FUN PART! – When I mounted the light, I drilled a hole in the bull-bar just under the DS mounting bracket. Since this bar is welded through the bumper, it’s open at the underside. “I can just snake the wires through that.” I thought. It’s like trying to shove a noodle through a straw!I abandoned the “shove it through” approach, then I abandoned the “pull it through with a coat hanger wire” approach and came up with the “hook-up-a-shop-vac-to-the-lower-end-and-suck-a-length-of- paracord-through-the-hole” approach. This worked so well that the first time I tried it, it snatched four feet of paracord out of my hand before I could kill the shop vac. I cut the spade connectors off and was then able to drag the connector wires up and out of the hole under the bracket. I connected them to the light with some of those melty solder butt-joint connectors, then slipped that back through the hole in the bull bar and sealed it up with some silicone sealer.I’d tested the harness and even hooked everything up to the light, so I knew it was good at that point, but when I flipped the switch---no joy. I checked all the connections, then realized there was an in-line 15 amp fuse…Yup---blown. I replaced it and blew it again just to make sure. I looked all along the runs for places I might have shorted it and was about to pull the A-pillar panels when I remembered that extra light connector I had taped up. Sure enough, I didn’t cut off the spade connectors there and had taped them together on the harness---creating a very solid and efficient short-circuit. Fixing this took about another half hour, but then It worked great.I’m not sure how many Lumens are generated by the Nilight - ZH006. It claims 126 W using 42 3W LEDs. I drove it out to a local area with an open field and totally ruined the circadian rhythms of about fifty Whitetails. It’s like driving around with a small sun on your bumper, in fact---if I ever accidentally shined this in another drivers eyes, I think an assault charge would be in order and I’d plead guilty with no contest.Nilight 20-Inch 126W Spot Flood Combo Offroad LED Light Bar & Wiring H – Nilight Led Light
A**.
Good value. Good quality.
Works great. Bright and decently made. The cables and switches are pretty thick and seem like they'll hold up well. I would buy it again if I need more.
R**H
Very impressed with the output and easy install.
Very impressed with the light this puts out… super easy to install too, and I’m not handy with these things.
M**R
It’s nice and bright works as it should
Mounted on my grill guard. I could not find a way to get the switch inside the cab of my 2018 ford f 150. No penetrations through the firewall? So the switch is exposed to the elements out on the front of the truck. ( this is no fault of the manufacturer) it’s super bright on those dark nights.
T**N
Super bright, easy to install, and affordable!!
So far love the brightness, quality, and ease of install. I bought 2 lights kits to install on my utility tractor for winter snow removal front and rear visibility. I bought the light kit that included the wiring harness as it was the most cost effective and I was running both separately. Product notes say you can connect 2 lights to one harness, which is true, but those would have to be installed within 3 feet, which was not my case. So 2 lights can run on one harness, but know they need to be installed close to each other. I cut off the extra connectors and sealed to waterproof the wires.I bought a mount kit for the front. I needed to add longer screws to clamp to my front guard . I did not want to drill through the front steel guard at this time. May do that in future. The rear was mounted on the rollover frame and the holes I used were already factory made, so that was easy. The mounts on the light are adjustable and slide the full length of the light body. I ran the wire down the outside and secured with special outdoor zipties. The switches included on the harness are waterproof and light up when on, which is great addition! Once I drilled a hole in the plastic dash the switches snapped into the opening securely. Use a tapered bit as you can test the hole size as you go!! The switch had a quick connector so once that just fit through the hole I know the switch would lock in securely.Install was easy and has inline fuse built into the harness. All parts needed to connect are included, even extra fuses and connectors. I used heat shrink to seal all connections since they would be exposed to water and snow. Also, since I mounted the light upside down, I seals with caulk the area where the wire enters the light body, just to be sure. I recommend these to add a bright light to any application!
A**R
Great value
Very bright, install was fairly quick and easy on my 01 sierra
M**E
Works great
It's really inexpensive and does the job. If you aren't a professional this will do what you need it too. No adjustable . . Who cares.I've used it twice and wish I bought a while back. Saves so much time. Lights up the whole street at night
Trustpilot
3 weeks ago
3 weeks ago