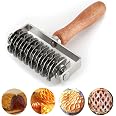
🍰 Elevate Your Baking Game with Style!
The Pastry Lattice Roller Cutter is a versatile kitchen tool made from high-quality 304 stainless steel, designed to create beautiful lattice patterns for a variety of baked goods. It's easy to use, perfect for all skill levels, and features a quick clean-up design, making it an essential addition to any baker's toolkit.
B**E
Perfect gadget for making pie crust lattice & others crust lattices
Used this for the first time to make the lattice layer of crust on BEEF Wellington. It worked splendidly. So simple & makes perfect lattice, just be sure to press it through the dough all the way or you'll be handles making slits with a knife.
B**B
Great quality!
Used it the same day I received it. Worked great and is a wooden handled tool. Love it!!
E**N
Fabulous and Fun for Any Bakers
This is one of those cooking gadgets you don't know you need until you need it. I just made a Beef Wellington and used this tool to create the "netting" affect on it. It worked incredibly easily and was so much fun to use. Not for little helpers except under supervision (sharpish rotary blades). I had read a couple of negative reviews of this before purchasing, but I can tell you it works really well if you have a solid, steady spot to use it and put your hand on the end of the pastry nearest you to secure it while you roll away from you. Really well made and I'm looking forward to using it to top holiday pies with beautiful lattice work. Definitely recommend!
C**N
Easy Lattice Pastry
No more trying to make lattice pastry by cutting individual strips. This device really takes the work out of making this pattern of pastry.
V**A
Super
Unbelievable, so beautiful. Looks as professional job
C**
Heavy duty
It works perfectly. It makes pies, Wellington and encrute recipes beautiful.
D**P
I would buy again, but be warned that it’s still a PITA no matter how you “slice” it.
I read a lot of reviews to find tips and tricks on using this thing, since clearly a lot of people have been having trouble. I wanted to use this to make a lattice on my beef Wellington, so I ordered one. Upon receiving it, I made sure all of the cutting wheels lined up on a flat surface, and as near as I can tell mine was pretty even.First of all, to all the complainers that this should have some sort of sheath because it’s dangerously sharp, shut up. This thing is absolutely not sharp and you certainly will not cut yourself by reaching your hand blindly into a drawer (who does that anyway?). It has some harsh corners/edges, but nothing that would slice skin. But I wouldn’t keep it loosely in a drawer anyway, just to protect the item itself from any damage that could render it useless.2nd of all, I really debated whether to spend more on this instead of the more affordable plastic models. Now that I have used this, I would never try this with a plastic one. Not only does the task require more force than I would be comfortable applying to a plastic tool, but I wouldn’t trust a plastic tool not to flex a little bit, which defeats the purpose of the clean/precise lines of a lattice.Now as for the operation of the product, the only conclusion I can come up with is that yes it creates beautiful garnishes for your projects, but be prepared for it to be a bit tedious. If you’re expecting to just be able to roll through your dough and move on to the next step, you’re gonna have a bad time.I tried the different tricks of making sure the puff pastry was partially frozen, pressing super hard, placing a towel underneath the dough, and flouring the rollers. In spite of all of this, I find that if you want a clean, sharp result on your project, you’re going to have to go back and touch things up. Here are my shares.First off, yes, always cut your puff pastry as close to frozen as possible without cracking it (this goes for any project. It helps to prevent the layers from squishing and sealing each other off, and it helps keep your edges/lines sharp. It also helps to keep the roller from stretching the dough too much while pushing through (which it will do a little bit). As for flouring the rollers, for me I found this unnecessary. The only place I really had to watch out for sticking was the very edge of the pastry. What I learned was that rolling onto the pastry starting at the edge was a mistake, because the pastry will just want to continue wrapping around with the rollers and then you have to reverse out of the rolling motion to get the dough off. Instead, what I suggest doing is starting in the middle of your pastry sheet and roll towards the edge of the pastry in one direction. Then go back to the middle of the pastry (being very careful to line up the rollers in the same rotational spot) and roll to the other edge of the pastry. This help ensures that the dough stretches in an even direction to prevent warping, but I really had no issues with sticking (again, my dough was very cold). Rolling very slowly while pressing firmly helps, and be careful to get your cuts exactly lined up and even and roll straight. You really only get one shot at this, as retracing new lines will completely ruin the effect.I highly recommend the dough is reasonably floured before cutting. It helps the rollers cut through cleanly without dragging unnecessarily, and you’re gonna have to reflour after cutting anyway, so you may as well have some on there to start with (rice flour is great if you’ve got it). Once you have finished your cuts, spread some flour in against the “grain” of your cuts to help fill the slits and prevent them from sealing. Do not try to stretch out/separate the lattices right after rolling, as the dough is likely too cold.Now here’s the finicky part: you’re gonna have to go back and touch up each and every slit. As hard as I pressed, most of the slits just aren’t 100% cut through all the way, or more commonly, they are cut through near the center of each slit, but towards the ends of each cut, they are still kind of attached. If you try to pull apart the lattice, you’ll end up with a warped/ripped dough and your project will be ruined. Trust me. You’re going to be tempted to try to gently pull apart the lattice to inspect your work and then just try to free up the spots that stick. Bad idea. If the dough is warmed up enough to allow you to spread the lattice, then any of those spots that stick will end up destroying any chance of getting clean lines. It sucks, but your best option is to just redo each and every cut individually before trying to spread it open. For a single sheet of puff pastry, this probably only takes like 3 minutes, so just muscle through. I promise it’s worth it.I like to use a slightly thicker blade like a butter knife as I find it gives the lines/edges a little more definition. At first I used a pairing knife, and I found it really doesn’t work as well because it isn’t thick enough to separate the dough edges. This is also where your earlier flouring will help, as it helps you visualize where all your cuts should be, and prevents the dough from resealing. If you notice that the dough is getting a little too warm at this stage (you’ll be able to tell by it starting to stick and stretch), pop it back into the freezer for just a few minutes. I find that between cutting the dough with the roller and redoing all the slits, I need to pop it back into the freezer at least once.Special tip, if you let this thing get too warm at any stage after you’ve cut it, transporting it without ruining it will be near impossible and you’re screwed. What I like to do is as soon as I’ve finished my initial rolling cuts and flouring on the cutting board, I slide it onto an inverted floured baking sheet. This allows me to transport it in and out of the freezer quite easily, and makes the deployment of the lattice onto your final project so much easier in the end. However, the pastry MUST be floured on both sides or it’ll stick to the tray, so if you need to add some flour to the bottom of your pastry after transferring from the cutting board to the inverted baking sheet, I recommend making sure the top of the dough is lightly floured, then place another baking sheet on top of the dough (bottom/flat side of baking sheet touching the dough), and gently pressing the sheets together as you flip over the dough. Then you can add flour between the dough and baking sheet, and repeat the flipping of the dough using the 2-sheet method.This brings up an important point, for the cleanest look, you’ll want the side of the pastry that the rollers went through to be your “presentation side,” so don’t lose track of which side that was. If you flip your dough over and use the underside as your final “presentation side,” your edges will be overly squared off and flared out and look weird. The process of the rollers pressing through the dough helps give it a pleasantly rounded shape that will look a bit more complex, so try to baby that side and not lose track of it. It’s much harder to hide mistakes on the “bottom” side.Anyway, once you finish redrawing all of your lines, the hard part is over! Just leave the dough out until it just starts to soften enough to begin to be compliant. You can test this by gently trying to spread out the lattice while still on the floured, inverted baking sheet. If it doesn’t readily open easily, then wait another minute or two. Once it is cooperative, I like to just partially spread the lattice to make sure each cut is properly freed and won’t fuse back together during storage.Now at this point you can either just add the lattice to your final project, or if you’re like me, you aren’t ready because you did this ahead and you can just cover it in plastic wrap and place into the fridge. If you’re going to store for more than an hour, I would put it in the freezer to prevent the flour from hydrating and turning sticky (again a reason why rice flour can work better). When it’s finally time to drape it over your project, you simply pull it out on the counter and let it warm up enough to be just the right amount of compliant. It’s a fine line between between too stiff to pull apart, and so soft that it’s flopping all over the place, so don’t get distracted while performing this stage. If you left it on the inverted baking sheet, all you have to do is GENTLY! slide it off the sheet slowly while guiding it onto your finished project (beef Wellington for me). I used 1 part egg yolk and 1 part water for my glue. As for the final egg wash, I recommend something thin for whatever you use (I did 1 part yolk to 2 parts water), and I recommend you apply it VERY, VERY thinly. Like, try to really desaturate your brush on the edge of your bowl before brushing onto the lattice. If your brush is too saturated, it’ll leave globs of egg wash in the corners and it’ll stick out like a sore thumb.Anyway, that’s my novel of tips and lessons learned. Is this tool a bit more work than I had bargained for? Yes, but is it worth it? 100%. I do not believe that I could achieve the precision and evenness needed to do this by hand, so even though I have to follow up the cuts by hand anyway, this tool helps me achieve better results in the end. Happy baking/cooking, y’all.
H**G
press down hard
wonderful but press down hard
Trustpilot
2 months ago
3 days ago