⚙️ Elevate your Ender 3 game—print sharper, print smarter!
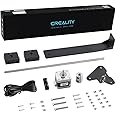
The Creality Official Ender 3 Dual Z-Axis Upgrade Kit includes a robust aluminum dual Z-axis structure and a precision 42-34 stepper motor, designed to enhance stability and print accuracy across all Ender 3 models. This official Creality product offers a cost-effective, easy-to-install upgrade backed by professional support, perfect for serious makers aiming to push their 3D printing quality to the next level.


| Manufacturer | Creality 3D |
| Part number | CRGJX-P-SZZ |
| Item Weight | 830 g |
| Product Dimensions | 36.5 x 4.2 x 0.1 cm; 830 g |
| Item model number | Ender 3 Dual Z-axis |
| Colour | New Packaging |
| Material | Aluminium |
| Batteries included? | No |
| Batteries Required? | No |
S**A
A really cool upgrade
I purchased this kit to add to my Ender 3 V2 and I have to say it's been a worthy investment.I often found with the Ender 3 and Ender 3 V2 that the far right hand side of the gantry would sometimes droop/sag slightly compared to the left side, no matter how many times you tighten it or adjust it the right side would always seem to end up progressively lower over time.This kit has corrected that issue and now every print has perfect layers with no imperfections. The dual Z screws ensure that the extruder is level at all times and prevents sag on the right side of the extruder arm.The kit is very easy to install and comes complete with everything you need. After mounting the new stepper motor on the right side of the printer it was just a case of attaching the z screw and collar, attaching the z screw alignment plates at the top of the z screws on both sides of the printer and then running the new cable from the stepper motors to the control board in the base. The cable provided is a split lead allowing you to plug both steppers (existing on the left and new on the right) in to the one socket that the left hand stepper motor was plugged in to.After running many prints with this kit installed I can honestly say that print quality has improved and layer consistency is now very accurate. I would highly recommend this upgrade to anyone who suffers with banding or a slant to their prints.A very nice kit that is very easy to install.
S**G
Works well
Not too difficult to install and fixed issue with my sloping Y axis, works well
S**T
A good upgrade to consider if you are looking at direct drive.
I have bought this to upgrade an Ender 3 Max. I know the lead screw supplied with this is too short but until the tight wads at Creality bring out a kit for it you have to buy one and buy longer lead screws to fit. Come on Creality, you sell your printers as upgradable then don't sell the proper parts - get your act together!This upgrade gives you a 2nd driver for you Z axis which means that both sides of the x axis bar stay level when going up and down. This is not such a problem on stock smaller bed printers but if you install a direct drive or have a larger print bed it can become a problem that really affects print quality. Once the head gets further away from the left hand side where the Z axis mechanism is the X axis bar can droop and play about with the printed layers.Its a little bit of a faff to install and I would strongly recommend you print a couple of Z axis calibration struts so to can be sure that the x axis is level with the frame. Once all fitted and set up the difference is pretty obvious in print quality.I already had one on an Ender 3 pro that has a direct drive and it made a massive difference. Once I had the Ender 3 Max I immediate saw the X axis dip on the right as it moved upwards and knew I had to fit dual Zs to get any sort of decent print quality. Once I fitted it the prints were much better so it was worth the outlay.
M**K
A leap forward in print quality
A great upgrade for my Ender 3 V2 and an absolute must-have if you want to use a direct drive extruder without suffering from the dreaded x-axis droop. I’ve only knocked off a star because the instructions are pretty useless. Fortunately it’s not hard to get everything screwed into place but it’s vital to get both sides properly synced and levelled, something which really should be in the installation instructions.
K**S
Makes prints so much better
I'd say this was easy and quick to install but firstly it was not overall cause I wanted this to be perfect, In total including leveling the bed and testing and tweaking I personally spent about 2 hours getting this absolutely perfect, I did not rush and did watch a video to assist to install.It has been so worth it putting this on my ender 3 v2 it has made print quality so much better overall and since pairing with an auto level and modifying the bed plate knobs to adjust the height Ive not needed to level my bed since.I can now also use my custom slicer settings which means printing miles faster and still getting quality results Id highly recommend this for an upgrade well worth the money.
M**M
Ender 3 Pro upgrade !
If you find your Ender 3 Pro X-axis droops, then fitting a second Z-axis lead screw will help dramatically.I will assume your are confident enough to work on your Ender and access the PLC control PCB.The actual kit is includes all necessary parts and is straight forward to instal.You will need some type of gauge block so that the x-axis is at the same height on the left and right hand side. A 3-2-1 gauge is ideal. You will almost certainly need release the mounting acreage on the existing left hand z-axis screw in order to set the height on the new z-axis.Using the gauge blocks on each side and with the x-axis in contact m. Just retighten the mounting screws.Once done the x-axis will move up and down and be level.Once installed and setup. The results are very impressive. Noticeable on bigger 3D models in the fact that there is no droop and things just look correct.If I would anything it would be to gear the left and right z-axis screws with a tooth drive belt running between them.As is you me in the hands of the stepper motors.
D**N
Really useful upgrade
I wanted to make my Z axis a bit more stable on my Ender 3v2 and this is just the ticket. There are cheaper ones out there but the OEM kit is much better. I found a really helpful video on YouTube showing how to install and square everything up and it has been great ever since.The only downside, and it is the same with all Creality upgrades for this machine, is that you have to access the control board to plug in the new cable.
S**Y
Essential upgrade for my Ender 3 V2 Neo
After noticing I had issues with my prints I decided this would be a good upgrade.Easy to fix and attach. You will need to level it with your other z axis. Once all that's done your away.Great value for money once you see the difference with the print when you've tweaked it.
Trustpilot
3 weeks ago
3 weeks ago