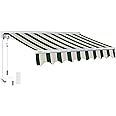
ADVANING 14'x10' Motorized Patio Retractable Awning | Luxury Series | Premium Quality, 100% Solution-Dyed European Acrylic UV Sun Shade, Color: Garden Green Stripes, EA1410-A808H2
S**R
More a 4.75 rating
The media could not be loaded. Great product. Easy install. Only issue I have post installation is that it is a very tight fit when the awning retracts into and out of the cassette. The front bar of the awning snaps into and out of the cassette. It is a slightly smoother fit when easy pitch is all the way down but I still get a pop and vibration upon opening and closing. This is not a usability issue now but does give me some concerns over longevity’s as the motor gets weaker and or metal fatigue sets in.Overall, I am very pleased. Looks great on the house. Was an easy install. Materials all appear top grade. I did have a 2 of the 3 brackets where the powder coating was either missed or scraped off during packing. This was an easy touch up before install. I did need to purchase and use 3/4” aluminum spacers on bottom bolts to compensate for change in siding material when installing the brackets. I was very lucky that a header ran across the top of the 4 windows the awning is installed above. This header eliminated the need for locating framing studs. The fact that the awning itself was fully assembled and the simplicity of the hanging brackets made this an easy DIY project. Great addition to the house.
J**M
Great value, wonderful function, superb support
I spent a great deal of time researching before making the decision to purchase this awning. I seriously considering purchase from a "nationally known" seller Su*****r awnings BUT they were almost twice as costly. Having never purchase an item this big, heavy, bulky and unusually shaped online I did have doubts. There were unexpected shippings delays that caused several weeks of false starts. HOWEVER, when it did FINALLY arrive it was EXTREMELY well packed and packaged and the awning was un-scathed. The 2 delivery men struggled a bit but the wrangled it off the truck and into my garage. I had cleared a temporary space for it. It took several hours to inspect and unpack. There were a set of bolts missing. I had purchased an awning that calls for 5 mounting brackets, concrete expansion bolts were ONLY supplied for 3.This leads me into one of the absolute BEST aspects of purchasing from ADVANING AWNING. Namely the exceptional support in general and the Customs service rep Jesse in particular. In many many instances he was available REALTIME with ACTIONABLE HELPFUL suggestion, from real world experience, he proved to be a very valuable resource who was always professional, patient, precise.My installation experiences below are just that they are not directions or suggestions, YOUR MILAGE MAY VARY.REVIEW the install video supplied by ADVANING several time and then twice more it offers precise steps to follow for PREPARATION, assemble all the tools in advance and check them for proper function.In my case i purchased a hammer drill on AMAZON (Dong Cheng DZJ05-13) For a very reasonable price. Trying to drill into concrete (10 holes @ 2 holes per bracket) with a conventional drill is EXTREMELY time consuming and very frustrating. IT WAS EXTREMELY important to select a high quality 1/2 inch masonry bit (also purchased on AMAZON). Wiggling the bit may help get the expansion bolts into the desired holes, it needs to fit VERY SUNGLY.2 bolts were damaged by me on install and I need 2 bolts quickly and purchased them from HD, I strongly suggest to use EXACTLY and ONLY the expansion bolts supplied by ADVANING, EVEN if it delays the project.After the caulk like was snapped and the 10 holes drilled and the bolts insetted. It was / is vitally important to do a dry run and make VERY SURE that the sleeves LOCK-IN-PLACE (then extract the bolts from the sleeves) then proceed.The CRITICAL part is marking on the vertical along the chalk like where the brackets will go, the placement of the outtermost brackets is ABSOLUTELY CRITICAL!!!!There is and can be a little bit oF play with the placement of the interior brackets (3 IN MY CASE).READ THE BRACKET PLACEMENT drawing in the manual several timeS BEFORE DRILLING!!!!!!!!Use a high quality silicone sealant ABOVE the bracket to prevent mostiure from working its way into the drilled holes.A MAJOR factor that allowed me (and a helper) to do the full install our selves was a DRY WALL LIFT JACK which was rented for a day from HD. YOUR MILAGE MAY VARY.With the dry wall jack and 2 people on 7 foot ladders the awning slipped into the brackets mostly OK!In 1 instance a RUBBER mallet was required to coax the torsion bar into its respective bracket, rubber mallet was used so that the finish would not get marred.RESPECT the warnings on the expansion arms BEFORE releasing them. VERY IMPORTANT !In my case I tested to full extension of the awning using the MANUAL crank that is always included.I wanted to inspect the full compliment of fabric with out the effects of the motor. After the manual test I I tried using the electric with the included remote (remember to remove the plastic insulation from the battery before trying to use the remote.Over all very pleased with the hardware. EXCEPTIONALLY pleased with support. Wish the shipping would have been more precise in terms of timing. Including a drill bit compatible with the expansion bolts would have been a nice touch and I think of minor cost.The awning, the company, the staff are all of high quality.If I had the need, I would purchase the exact same again! :-)
V**H
Great product. Lacks wind sensor
Easy to install, works great. Have used it for a while now, very reliable.I would have given a 5 if it had a wind sensor to close it on high winds, I find myself running to close it whenever the wind picks up. One strong wind whilre it is open cold damage it making it no longer useableAlso, it would have been great if it had an app to manage it. Setting the open and close limits is manual, though not very diffult. But would be nice to manage it from an app.
S**B
Excellent quality and Customer Service
I really like this awning. I bought the 12 x 10 motorized version and wanted it installed above a new deck. However, the soffit height above the deck was only about 7-1/2 feet so I wanted to see about mounting it on the roof. After watching some YouTube videos, I located nice stainless steel brackets from Source One Distribution in Florida. I asked tech support at Advaning and they actually mentioned the brackets from Source One. I ordered three of the brackets from Source One; they were about $55 each and very well made with all of the stainless steel fasteners included. The fasteners are high-quality with washers and rubberized lock nots.One thing I ran into: the house is a ranch with the trusses spaced 2 feet on center. The awning mounting rail is about 11'10" so I wasn't going to be able to get the two outside brackets at the ends of the awning. The instructions say to mount the awning brackets outside of the arms that lower the awning and these are positioned about 4" from either side. I called Advaning tech support and told them what I had, and the rep said that they could be positioned farther in as long as the brackets were clear of the arms. So I was able to install the two outside brackets 10' apart and the center one at 4' from one of the ends. By the way, Advaning's tech support was great. I left a message both times I called and they got right back to me (thank you Jesse!).As far as installation, I drilled pilot holes in the asphalt roof, making sure I hit the trusses. I put some roofing cement under each bracket and used the supplied lag bolts to secure the bottom of the brackets to the roof. The lag bolts come with the awning, not the roof brackets. Then I assembled the rest of the roof brackets, using a level to get the mounting face plumb.Before securing the white awning brackets to the roof brackets, I had to slightly enlarge the two holes in the stainless steel roof brackets with a drill bit. I fastened the awning brackets to the roof brackets.The awning is heavy but my son and I were able to walk up two stepladders and slide it onto the brackets. After sliding it in, we slid the retaining bolts and nuts in place and had some room to slide the awning side-to-side to center it on the deck. After it was centered, I tightened the bolts, removed the shipping restraints, and plugged it in. After a few minor leveling adjustments, we had a beautiful working awning!Here are some things to know when considering roof mounting:1) If you have good soffit clearance, it is preferable to wall or soffit mount it if you can. This gives you more weather protection and will save you the expense of roof brackets.2) We live in the northeast with harsh winters so it will be important to protect a roof-mounted awning. Also, being roof mounted can expose it to more wind regardless of the season. Advaning does sell a cover for the awning, but I may consider taking it down for the winter.3) You will be putting holes in your roof! Make sure you know what you are doing or get professional help. I used a high-quality, all-weather roof cement to seal in the brackets. And don't cut corners on roof brackets. I am very happy with the Source One brackets.As far as color, I purchased the khaki, but it is more of a deep golden yellow (which is fine, but not quite the color I was expecting). It does make it cheery underneath when the sun is out. See the pics attached.I am very satisfied with the awning and would highly recommend Advaning!!
Trustpilot
5 days ago
2 months ago